Overall I am pleased with the animation that I have created. I think that the Airport section looks the best and the section of the Crane scene with the pipes falling from the crane. I am happy with how the different sections fitted together and the transitions between the three scenes.
The Casino section feels a bit empty as there is not much happening as some parts had to be removed as I was running out of time for animation. I didn’t animate the section where Bond would push his pokerchips into play. I think that including this part would have improved this section of the animation.
I also think that the casino scene has too many camera animations and it would look better with some more fixed camera sections.
All in all I think that making the animation went well and I was able to finish the animation on time. Although I think that I should have started animating earlier as I spent sometime after the first assignment creating the rest of the objects in the scene.
Also I think that I should have decided to model a character for one of my three models as I would have been able to spend more time on it rather than having to model and rig it afterwards as I have a character in each scene so it is quite important.
To improve the animation I think that I should include more animation for the characters as in some scenes the characters do not have any motion, this is most noticeable in the casino scene. It may have been better to go for a simpler idea with fewer characters or had scenes with vehicles that would not require the animation of characters.
There are some problems with the animation, such as when the camera moves when the pipes fall to the ground, this happened because the camera was linked to the pipes so when they spread out it moved the camera as well. Originally I thought that this looked good as it looked like the camera was being shaken by the impact but now looking at it again it doesn’t look right as the camera wouldn’t move as it would be too high up.
In the airport scene the wheels of the truck are not spinning as I didn’t plan to have a camera shot from the side, apart from at a distance, so I didn’t animate the wheels moving (apart from the wheel close up section). I then added in an extra shot right at the end and didn’t think about this. The wheel section has an error in the mesh that you can see as it is rotating although this is not that noticeable.
There were some problems in the casino scene when the camera looks over Bonds shoulder the dealer hand is clipping through the cards and are raised above the table. I think that this may have been because I rotated the cards so that they were the other way up and the centre point wasn’t in the middle.
When Le Chiffre looks at the cards you can see his fingertips through the cards in some of the frames I don’t think that you notice this in the animation so this is not a problem.
I think that I could have simplified the animation and not tried to accomplish too much as I had to remove some sections that I had planned in my storyboard and planned out the animation better as some bits were a bit too long. I think that the flow of the animation is not great near the end due to the sections that have been removed.
I think that the music worked well with the animation but some of the sound effects could have used some more work to find better ones and sound effects for the some of the other sections of the animation. The music doesn’t end that well at the end of the animation, I think that maybe this should fade out as the ending is quite abrupt.
After having created the animation I think that I should have used an empty to animate the truck rather than using a group as the animation is applied to the group and if this is ungrouped the animation will be lost. I read this after having animated this section so did not go back and change it. The objects that need to move together either need to be attached together or linked to an empty so that they would move with it.
I think that creating this project was quite difficult as we didn’t learn about the animation techniques until later in the semester so it was hard to imagine how you could achieve what you wanted to do earlier in the production.
Wednesday 13 April 2011
Finished trailer
Here is the final trailer but the video quality isn't very good displayed here in blogger
I rendered my animation as 720p HD and the final video is a f4V file. I edited the sections of the animation together in Premier and added the Casino Royale theme and some sound effects to the animation.
Friday 8 April 2011
Rendering
I rendered my animation as BMPs and then joined them together into uncompressed AVIs before editing the videos together.
This way I could stop the rendering at any time and not lose the frames I had already rendered as they were saved as individual files. Also if there was a problem I wouldn’t have to start rendering from the beginning again for example if some frames have an error only these frames would need to be re-rendered.
When rendering the section that looks across the crane scene I had to increase image precision as the ropes for the crane were not visible and only displayed in sections but this increased render time.
Thursday 7 April 2011
Creating the explosion
 I followed some tutorials to create the explosion in the animation. I used parts from the two tutorials as the first one that I followed did not look as I wanted.
I animated the size of the explosion as the truck crashes through the bus. It was quite difficult to get the explosion so that it looked the right size for the scene and either wasn't too small at the start or too large at the end, but I think that the final explosion looks good.
Animation problems
I had problems when trying to animate the characters that I had merged from a separate file I had created them in.
Moving and positioning the biped worked but when I used autokey to start the animation there would be an error and 3ds max would crash when any of the bones were moved.
I made a new biped in the scene where I needed to animate the character and applied this to the character mesh allowing me to animate the character without the error.
Tuesday 5 April 2011
Adding the character to the truck
 I linked the character to the truck so that it would move along with it and then started to animate the biped so that he would have some movement.
I linked the hands of the biped to the truck so that they would be planted there so that when moving the character his hands would stay in the same place as though he was hanging on.
Wednesday 30 March 2011
Rope simulation
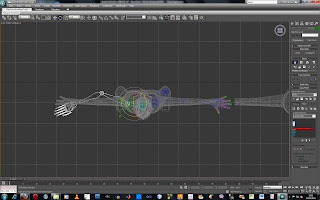
 Having used the reactor to animate the pipes falling I tried using a rope simulation to create the rope. I created a created two spline lines that would be used for the ropes. I set up the rope simulation attaching the vetices at the end of the splines to the pipes that were set up as rigid bodies. I then used the loft tool to add depth to the spline to make it look like a rope.
This worked ok but part way into the simulation it went wrong moving unrealistically. As I will only be using a shot clip of this section this will not matter as I can stop the animation before this part.
 The rope has behaved incorrectly and thrown the pipes and other rigid body objects around the scene
Tuesday 29 March 2011
Pipes falling
I used the reactor for the section of my animation where the pipes fall from the crane. I added the pipes and the floor into a rigid body collection and adjusted the masses. I had a problem where some of the objects would fall through the ground object.
 I increased the faces of the floor and this stopped the problem for the larger pieces but some of the small pieces still fall through the floor. I decided that this was good enough as you cannot see this from the camera angle that is being used and I don’t have time to keep adjusting it.
 I think that increasing the faces may just have been a coincidence as increasing the faces more made the problem worse and more of the objects fell through the ground.
The pipes still intersect with one another but again this can’t be seen from where the camera is.
Bowling
 Here the reactor was used to create a bowling animation. The pins, ball and alley were added to the the rigid body collection and the mass were adjusted for the separate items. Autokey was used to move the bowling ball forward so that it had some forward force and spin was added to the ball.
 Then when the reactor was previewed the ball fell onto the alley and rolled into the pins knocking them down. Adjusting the collision tolerance stopped the pins from falling partly into the floor.
Below is the animation from two different angle, some basic materials were added the scene so that it wasn't just plain grey.
Reactor
This is my first attempt at using the reactor. Two boxes were created one for the ground and the other for a falling box. A rigid body collection was added and the two box objects added to it.
In the utilities tab I set up the reactor here I adjusted the mass, friction and elasticity for the box and the ground. keeping the mass of the ground at 0 and making the box more then zero meant that the ground would not fall.
Clicking on 'preview in window' button displayed a window that displays the simulation, pressing p plays the simulation. When this is correct the create 'animation button' can be pressed to turn the simulation into keyframes. Then this can be rendered, here is a render of of the box falling.
Monday 28 March 2011
SWOT analysis
Strengths
- The three models that I have made have turned out well so I do not need to remodel them
- Other models that have created for the scenes have turned out quite well
- I think that the idea for my animation is quite good
- I have modelled most of the objects that need to be modelled
- I have made a storyboard and have planned the animation
- Setting up the lighting for a scene
- Adding textures and materials to objects
- Adding unnecessary detail on models that won’t be viewed close up
- Spending too much time on modelling before moving onto animation
- Not modelling the most important parts first
- Not always looking at plans that I have made
- I haven’t animated in 3d studio max before this module
- To make a good animation that I can be proud of
- To see what I have made come together into a final product
- There is still time to sort out what I am doing and make any changes necessary
- I have access to lecturers who I can ask for help/ideas
- The deadline
- The amount of time left to finish the animation and render
- Needing to model other objects for the animation
- Lighting the scenes especially the scene that is set at night
- The amount that still needs to be done and fitting this in with other modules
- The amount of scenes that I planned to create for my animation
Friday 25 March 2011
Using rigged characters
 I had some problems with the character that I had created an rigged for my scenes. When I imported them into the animation scenes they were too big and I could scale the character as they had already been rigged, the biped and mesh couldn't be scaled at the same time and scaling either of the parts would cause the mesh to deform incorrectly.
To get around this problem I scaled the scene so that it was the right size for the character. As I hadn't done any animation in these scenes it was ok. For the other scene as I had already started animating scaling the scene caused problems so I removed the biped and imported only the character mesh. I then scaled it to the right size and quickly created another biped. As I had already done this before I managed to do this more quickly.
If I were to do this again I would import the character into the scene and adjust their size before making the biped.
After sorting out the model I positions Bond so that he was laying on the top of the truck. I tried to make it look as though he was trying to hold onto the rails on the top of the truck. Next I will link him to the truck so that he will move along with it as it is animated. I will then animate him so he looks as though he is going to stand up but when he sees the bus he will hide back down due to the explosion.
 Render from above the truck
Thursday 24 March 2011
Attaching clothes
 After having created the clothes for the model I needed to attach them to the body mesh so that they would also move with the biped. I tried adding another skin modifier to only the clothes but this didn't work.
So that there were not a lot of extra vertices that wouldn't be needed, as they were covered by the clothes, I deleted the vertices that wouldn't be seen.
 I then used the attach tool to put the clothes into the same object as the body. Now the clothes moved with the biped as they were all one single object. I didn't weld the vertices together so that the parts kept their shape and to save time.
 I don't think that you will be able to notice this as the viewer will not look that closely and I scaled some sections so that you will not be able to holes in the character.
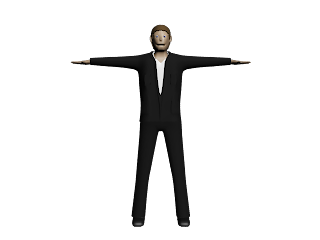
 Here are render of bond for the crane scene (above) and the airport scene (below)
Bond
I finished the person model that I was creating and then added the hand model to the mesh. I had to join and reposition some of the vertices in the arm as there weren’t the same amount of vertices in the end of the hand and the arm. I could have done with adding some more edge loops to the arm but I didn’t want to have to adjust the rest of the model as this looked ok.
 The model contained some lumps and bumps that could be removed with more time but it looks ok with a turbosmooth applied. The model could be improved by sorted out to topology so that the edges flow better. Some parts of the model don’t look perfectly correct and I had problems with the mouth. When the turbosmooth was added the mouth opened further than I had expected. By adding some more vertices and adjusting them I was able to fix the mouth.
To model the hair I cloned some of the polygons from the head to a new object and then added a shell modifier to create some height to the polygons. I don’t know if this is the right way to go about it but it worked ok. I didn’t want to create hair using hair and fur as this wouldn’t have gone with the character who looked more cartoony.
 I collapsed the modifiers and then edited the vertices. I was going to apply a turbosmooth but decided not to as it looked too smooth with this applied.
I decided to model the clothes as separate objects as I thought that this would make it easier to change the clothes for the different scenes and to create the different characters.
I tried to use the garment maker but did not succeed so decided to use a similar way to how I modelled the hair.
I cloned the man model and then deleted the head, legs and hands so that I could make a shirt. I scaled the section that was left so that it was larger than the character and moved it into place before scaling specific sections and moving vertices to stop parts of the character showing through the clothes. Then I modelled detail onto this, like creating a collar. I used the same method to model the shoes, jacket and trousers.
 After having modelled Bond I used the biped to rig the model. I changed the biped parameters so that the biped had fingers but no toes, as Bond is wearing shoes. I added a biped positioned it in place and scaled the sections to the correct size.
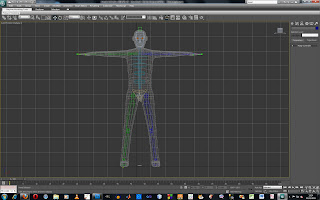 In the motion panel I used copy posture button to copy the position of bones on one side then with the bone on the other side selected I used the paste posture opposite button to position the bone in the same way on the other side. I could have used the symmetrical button to copy the adjustments made to the bones on to the one on the other side but I had already started moving the bones before finding out about this.
 I then added a skin modifier to the mesh and added the bones for the biped to the skin modifier.
Treatment, storyboard and script
In the previous posts are my storyboard, treatment and script to get my blog up to date. Now I have started the animation I am simplying the storyboard as there is not much time left and it was quite long and complicated.


Tuesday 22 March 2011
Yawn
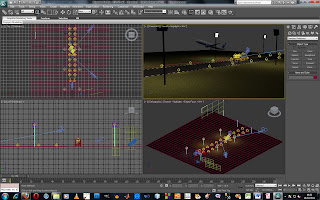
Using the morpher expressions that I created for the head model I have tried to animate the character yawning.
Morpher
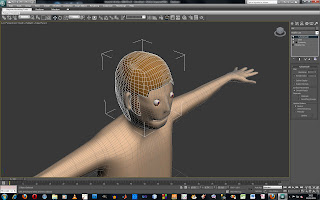
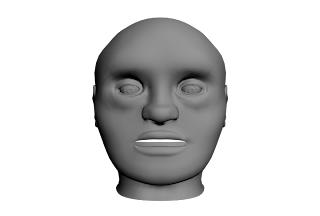
 I imported the head model and converted it to a editable poly. I cloned the head 7 times and kept one of the heads as the main head, the other ones will be used to create the different expressions. I modified the polygon of the heads to create mouth open, mouth closed, left eye closed, right eye closed, left eyebrow up, right eyebrow up and named the heads so I could identify them.
 I added a morpher modifier to the original head and then right clicking in one of the empty boxes click pick from scene and chose one of the heads. I repeated this for the rest of the heads. Next to the boxes is a number box that can be changed between 0 and 100. At 0 the head with the modifier mesh looks normal but at one hundred the mesh has moved to the same place as the selected head. I added a turbosmooth modifier above the morpher modifier to smooth the head model.
By animating these values, using autokey, facial expressions can be created. Using the curve editor and the dope sheet helps when animating as you can exclude the separate keyframe tracks as it is hard to tell what keyframe on the time line is for what expression as they are all shown in the same colour.

Facial expressions
 Default
 Default
 Eyebrows up
 Eyes closed
 Mouth closed
 Mouth open
 Wink
WinkFriday 18 March 2011
Animation
I started by animating the truck scene. I created a path and used the path constraint to animate the movement of the truck. I linked the camera to the truck so that I could create the section where the camera follows the truck.
To create the blinking light I animated the intensity of the light and adjusted the material that was applied to the light object I then used out of range cycle to make the light flash constantly.
To create the truck crashing through the bus I duplicated the bus model and split the mesh in half. I hid the first model of the bus when animating the separate parts.
Here is the first test render of this section. I haven't put bond on the roof of the truck or the driver inside yet and the orange light is flashing too fast. I will also slow down this section as it is a bit too fast as well as using different camera angle.
Thursday 17 March 2011
Crane scene
 I imported the unfinished building, the crane the pipes and the cable reel into 3ds max and placed them in the scene. I set up a daylight system to light the scene and create a sky. Now the scene is ready I will be ing the animation.
Casino scene
 I finished off the casino room for the animation here is a render of what it looks like. I imported the bottles and glasses that I had made along with the chairs and the poker table. I modelled the tables and placed them around the scene.
Airport scene
For the airport scene I extended the ground plane that I had made earlier and imported the truck, plane boarding stairs, and bus that I had modelled. I added bitmaps of aeroplanes onto planes and used opacity maps to remove the background from the images.
 Before setting up the lighting with default lighting
I added spotlights for the headlights and omni lights for the smaller lights on the truck I linked these lights to the truck so that they would move with the truck when it is being animated.
I added lights to the edge of the road and created some street to illuminate the scene. I adjusted the decay so that the light would reduce its strength the further away from the light source I adjusted the lights so that the edge of the scene looked dark, as though it was at night, but the truck and main objects in the scene were illuminated enough.
 After adding lighting to the scene
 Before setting up the lighting with default lighting
I added lights to the edge of the road and created some street to illuminate the scene. I adjusted the decay so that the light would reduce its strength the further away from the light source I adjusted the lights so that the edge of the scene looked dark, as though it was at night, but the truck and main objects in the scene were illuminated enough.
 After adding lighting to the scene
Bus
I imported the bus that I had modelled in Blender after having exported it as an OBJ. When importing the model I made sure I clicked import as single mesh otherwise it would not import correctly as the model was made up of multiple parts.
 I adjusted the materials and improved the model in 3ds max.

 To model the pipes I also used Blender, I modelled a quarter of the circumference of the pipe I used a mirror modifier (symmetry modifier in 3ds max) to create full circle and then used an array modifier to make a series of the shape I had created using a curve modifier to make the mesh follow a spline curve.
 When importing the pipes I didn’t need to check import as single mesh as there was only one model in the OBJ file. I created the plane boarding stairs in Blender and imported them into 3ds max as well.

 I adjusted the materials and improved the model in 3ds max.
 To model the pipes I also used Blender, I modelled a quarter of the circumference of the pipe I used a mirror modifier (symmetry modifier in 3ds max) to create full circle and then used an array modifier to make a series of the shape I had created using a curve modifier to make the mesh follow a spline curve.
 When importing the pipes I didn’t need to check import as single mesh as there was only one model in the OBJ file. I created the plane boarding stairs in Blender and imported them into 3ds max as well.
Subscribe to:
Posts (Atom)